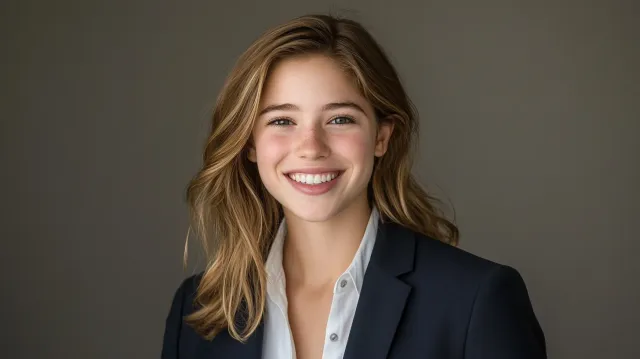
Headshots
Graduation Headshots: A Studio Photography Guide
Graduation headshots for college and graduate-school students entering the professional job market.
Chris McCarthy
Professional Photographer, Photography Shark · April 30, 2026 · Updated May 18, 2026
Graduation is a transition point: from being a student to being a working professional. Most graduates need a professional headshot for that transition — a LinkedIn profile, a resume, early-career job applications, alumni directory listings. Graduation headshots are distinct from senior portraits (the celebration imagery often shot outdoors with cap and gown). They are studio professional headshots from the start, calibrated for the use cases that matter as you enter the workforce.
After more than a decade and 500-plus headshot sessions at my Rockland studio, the patterns are consistent.
Why Graduation Is the Right Time
The case for getting a professional headshot at or near graduation:
LinkedIn becomes immediately important. The job search starts (or accelerates) at graduation. LinkedIn is the central platform for early-career professional networking, and the profile photo is among the first things any recruiter or networking contact will see. A professional headshot signals seriousness from day one.
Your headshot is the first thing many employers see. Resume reviews, application portals, alumni networks, and increasingly the screening AI tools used by larger employers all surface your professional photo before they read your resume in detail. A casual or selfie-quality photo creates a first-impression problem before you've had a chance to make your case.
You'll use this photo for the next 2–3 years. The graduate-into-first-job period is roughly when the photo gets the most use — application after application, networking event after networking event. The cost-per-use of a $395 session is low when the photo serves dozens of professional touchpoints.
You only get this photo opportunity once at this life stage. Headshots taken in early career capture you at a specific point. The next time you meaningfully update is usually 3–5 years in. Doing one well at graduation locks in a strong starting professional presence.
Graduation Headshots vs Senior Portraits
The two terms are often confused. The practical distinction:
| Factor | Graduation headshot | Senior portrait |
|---|---|---|
| Purpose | Professional use (LinkedIn, resume) | Celebration, family memory |
| Setting | Studio | Often outdoor or campus location |
| Wardrobe | Job-interview professional | Casual/lifestyle, often with cap and gown |
| Framing | Tight headshot crop | Variable, often broader |
| Format | Square + vertical for LinkedIn/print | Variable for print and personal use |
| Use lifespan | 2–3 years professional | Indefinite personal/family |
| Booking | Studio photographer | Sometimes the same, sometimes a portrait photographer |
It's reasonable to do both — many graduates book a professional studio headshot session for the LinkedIn-ready photo plus a separate outdoor session for cap-and-gown ceremony imagery. The two serve different purposes and shouldn't be combined into one session.
Photography Shark is a studio specialist. Outdoor senior portrait work — campus photos, ceremony imagery, lifestyle senior portraits — is handled by the companion brand at southshorephotography.com. The two sites share the same photographer (Chris McCarthy) but cover different photographic categories.
Wardrobe Guidance
Wear what you'd wear to an interview in your target industry. Specifics:
For Office / Professional Services Roles
- Blazer over solid-color shirt. Navy, charcoal, or black blazer. White, light blue, or pale color shirt underneath.
- Neutral palette. Avoid bright colors that read as informal at thumbnail scale.
- Solid colors, no busy patterns. Patterns can compete with the face and date faster.
- No tie unless your industry requires it. Most industries are tie-optional now; over-formal can read as out-of-touch.
For Creative / Tech Roles
- Button-down or sweater. Less formal than blazer + shirt, but still polished.
- Solid colors. Same rules — avoid busy patterns.
- Slightly more relaxed expression in the photo session. The wardrobe signals "professional but approachable."
For Healthcare / Medical Roles
- Professional but not overly formal. Healthcare typically photographs warmer than corporate.
- White coat option if you're in a clinical role and have one; otherwise solid professional.
- Open expression. Patients want to see approachable providers.
Universal Rules
- Bring 2–3 wardrobe options. Photographer can pick what works best with lighting and background.
- Iron everything. Wrinkles photograph more visibly than they look in person.
- No logos or text on clothing. Distracting at any scale.
- Avoid pure white for shirt color. Off-white, cream, or pale blue work better against most backgrounds. Pure white can wash out in some lighting.
For more depth, see the headshot wardrobe guide.
What to Bring to the Session
- 2–3 wardrobe options in different categories (formal blazer + casual button-down, for example)
- Lint roller (for catching surprise lint pickup before frames)
- Touch-up makeup if applicable
- Hair brush for between-frame fixes
- Confidence in arriving 5–10 minutes early. Rushed energy reads in the first frames.
What you don't need to bring: your cap and gown (separate session for that), specific posing knowledge (the photographer directs you), or printed examples (verbal description during consultation is sufficient).
What the Session Looks Like
A typical Photography Shark graduation headshot session:
- Brief check-in. ~5 minutes. Wardrobe and look-order discussion.
- First wardrobe. ~15 minutes of shooting. Often the more formal of the options.
- Second wardrobe. ~15 minutes. Lighting may be re-set for the new wardrobe color.
- Same-day preview. Quick review of 5–10 frames so you know what landed before you leave.
- Retouched gallery delivery. 3–5 business days.
Total session length: ~30–60 minutes. The session is calm and direction-driven — you don't need to know how to pose; the photographer guides you frame by frame.
What You Get
A standard graduation session at Photography Shark includes:
- 10 fully retouched high-resolution images
- Multiple wardrobe options across the session
- Full commercial use rights (LinkedIn, resume, professional use, no expiration)
- Files delivered in formats suitable for LinkedIn (square crop), print (high-res), and standard web (medium-res)
- Same-day preview of selected frames
For pricing details and what's included at each tier of the Boston market, see headshot cost Boston.
When to Book
The booking timeline that works well for graduating students:
- Early job applicants (industries with fall start dates): book 3–6 months before graduation
- Spring graduates with summer job start: book in the 60 days before graduation
- Pre-application updates: book whenever you start applying — the photo gets immediate use
- Post-graduation: book in the first 30 days, before the LinkedIn profile gap matters
If you're targeting competitive industries (consulting, finance, big tech), booking earlier and using the photo across the application cycle is the higher-ROI choice.
How Graduation Headshots Date
A practical detail: graduation headshots last 2–3 years before they start to show their age. The signs:
- The face has matured (most pronounced for graduates in their early 20s)
- Hair, glasses, and styling choices have shifted
- Wardrobe trends have moved on
- The "early-career" energy of the photo no longer matches your actual seniority
Plan to update your headshot at the 2–3 year mark, when you're settled in your role and the next phase of professional context (mid-career LinkedIn, professional speaking, leadership profiles) needs imagery that matches where you actually are.
Booking Notes for Boston-Area Schools
Photography Shark is 35 minutes south of downtown Boston via Route 3. Common access from Boston-area campuses:
- BU, BC, Northeastern, MIT, Harvard, Tufts — drive south via I-93/Route 3, ~30–40 minutes depending on traffic
- Suffolk, Emerson, Berklee — same access, typically 30–35 minutes
- UMass Boston — closer; ~25 minutes
- South Shore commuter rail access if driving isn't preferred (Rockland is a short walk from a commuter line stop)
Free on-site parking. No city commute required.
Industry-specific timing patterns
Different industries hire on different cycles, and your graduation headshot timing should match the hiring cycle:
- Investment banking, consulting (MBB, Big Four), corporate law (BigLaw): Application cycles run 12-18 months before start dates. Photo needed 18+ months before graduation for summer associate / analyst applications. Most students at Harvard Business School, MIT Sloan, and BU Law have done their headshots before fall recruiting kicks off.
- Tech (FAANG, mid-tier startups, biotech): Application cycles vary but typically 4-12 months ahead. Photo by spring of senior year for fall starts; earlier if applying to coveted internships.
- Healthcare clinical roles (medicine, nursing, PT, OT): Photo needed at the start of clinical year (year 3 medical school, year 2-3 PA/NP, senior nursing) when externships and rotations begin requiring professional profiles.
- Education (teaching, school administration): Photo needed by January of graduation year for spring hiring cycle.
- Government / nonprofit: More variable. Generally before graduation, but the photo can be added to LinkedIn later if the hiring is already underway.
- Creative industries (advertising, design, marketing): Less photo-driven hiring, but a strong LinkedIn presence still helps. Timing flexible.
- Self-employed / freelance launches: Photo when the brand goes live, which is sometimes pre-graduation, sometimes during the first 6 months out.
The gap between graduation and first-job — what to do
Many graduates have a 1-4 month gap between graduation and starting their first job. During this gap:
- Update LinkedIn immediately at graduation. The new headshot, the updated education field, the new skills, the recent project showcases all go live in the same week.
- Schedule informational interviews. A professional headshot signals seriousness for these meetings, even when they're casual.
- Attend industry events. Recent graduate status + strong headshot is a common combination at networking events.
- Plan the next refresh. Some graduates do a "first 6 months out" refresh once the role is concrete. Most wait 2-3 years.
Specific Boston-area programs and timing
A few Boston-area programs with predictable graduation-headshot patterns Photography Shark sees:
- Harvard Business School (HBS): MBA students typically book in their first semester (October-November) before fall recruiting. The HBS visual standard is polished but not stiff.
- MIT Sloan / Sloan Fellows: Similar fall timing, with a slightly more tech/quant register.
- BU School of Law: Photos before fall OCI (on-campus interviewing) in late summer.
- Northeastern University (co-op rotations): Pattern varies — co-op-pre students need photos earlier than thesis-track students.
- Boston College Carroll School: Junior-senior year for the recruiting cycle.
- Tufts / Brandeis / Wellesley: Variable, but typically before the first major job search push.
- MGH Institute, Simmons, Regis (clinical professional schools): Pre-clinical-year photo is standard.
Booking 2-3 weeks in advance of the session is typical; longer for spring/summer when graduation season peaks.
Ready to Book?
Get in touch to schedule. Sessions start at $395 with 10 fully retouched images and full commercial use included.
Related reading: What is a headshot? · Headshot wardrobe guide · Professional headshot poses · LinkedIn headshots Boston
Frequently Asked Questions
What is a graduation headshot?
A graduation headshot is a professional studio headshot taken at or near graduation, typically used for the new graduate's first professional contexts — LinkedIn profile, resume, job application materials, alumni directories, and early-career professional profiles. It is distinct from senior portraits, which are celebration-oriented and often outdoor/lifestyle. Graduation headshots are professional-format from the start.
Are graduation headshots the same as senior portraits?
No. Senior portraits are celebration imagery — often outdoor, often with cap and gown, often paired with lifestyle imagery for the graduate's family and personal use. Graduation headshots are professional studio photographs intended for LinkedIn, resumes, and first-job applications. The two categories are sometimes booked together but serve different purposes. Photography Shark is a studio specialist; outdoor senior portraits are handled by southshorephotography.com.
When should I get a graduation headshot?
Most graduates book in the 60 days before or after graduation. Pre- graduation timing lets you use the photo for early job applications. Post-graduation timing gives you the photo to add to LinkedIn and job-search materials immediately as you start applying. Either is reasonable — the constraint is when you need the photo, not the ceremony date itself.
What should I wear for a graduation headshot?
Wear what you would wear to a job interview in your target industry. For most office or professional roles: blazer over a solid-color shirt, neutral colors (navy, charcoal, white). For creative or tech roles: button-down or sweater, less formal but still polished. Avoid cap and gown for the headshot — that is for ceremony imagery, not professional headshots. Save the cap and gown photos for separate celebration shots.
How much does a graduation headshot cost?
Photography Shark studio headshot sessions start at $395 and include 10 fully retouched images, multiple wardrobe options, and full commercial use rights. This is appropriate for graduating students who need a professional headshot they can use across LinkedIn, resumes, and early-career professional contexts. Sessions run 30–60 minutes.
Related Posts

You Might Also Like
About the Author
Chris McCarthy
Chris McCarthy has run Photography Shark Studios in Rockland, MA for over 10 years and 500+ sessions, with executive headshot work for Rockland Trust, Clean Harbors, M&T Bank, and McCarthy Planning; founder portraits for AI startups including Lowtouch.ai; product photography for South Shore brands like Lauren's Swim; and headshots across South Shore legal, medical, financial, and academic practices. Every session is personally shot and edited by Chris on Sony mirrorless and Godox strobe systems — no assistants, no outsourcing, no batch retouching. Galleries deliver in 3–5 business days. About the photographer →
Photography Shark · Boston & South Shore MA
Ready to Book a Session?
Professional headshots, senior portraits, boudoir, and model portfolios. Studio in Rockland, MA — 25 miles south of Boston. Sessions from $395.