Dating Photography
How to Take Good Dating Profile Pictures: A Photographer's Guide
Lighting, camera angle, expression, wardrobe, and lineup design — exactly how to take dating profile photos that actually work, whether you shoot them yourself or work with a friend, from a Boston headshot studio.
Chris McCarthy
Professional Photographer, Photography Shark · May 29, 2026
A good dating profile photo is mostly the result of three controllable variables: light, angle, and expression. Get those three right and almost any face photographs well; get them wrong and even an attractive person looks off. Most of the technical advice that floats around dating-app content is overcomplicated — the photographer's version is actually simpler than the influencer version. This guide breaks down exactly how to take dating profile pictures that work, whether you're shooting them yourself with a friend's help or evaluating what a session at a studio should produce.
I shoot headshots and dating-profile sessions out of a studio in Rockland, MA, and a meaningful share of the work is teaching clients what makes a photo "look good" so they can recognize it themselves. The rules are not subjective. Here is the full breakdown.
The Three Variables That Matter
Light, angle, and expression. Everything else — wardrobe, background, editing, retouching — sits at a lower priority. If you fix only those three, your dating photos will outperform most of what's currently on the apps. The order also matters: light is the constraint that everything else has to work around, angle is the next-most-impactful, and expression is the variable you can change shot-to-shot.
Light determines whether the face renders accurately and flatteringly. Soft, slightly elevated, frontal light is the target. Hard overhead sun and overhead indoor bulbs are the two most common reasons DIY photos look harsh.
Angle determines whether facial proportions read normally. Eye-level is the safe default. Slightly above or below has uses; significantly off — selfie angles in particular — almost always hurts.
Expression is the variable that distinguishes "technically correct" from "a photo someone wants to swipe right on." A real warm smile in the eyes is the highest-value expression for the lead slot, and it's the one that's hardest to fake.
Each of these is covered below.
Light: Where to Shoot
There are two reliable free light sources that consistently produce good portraits.
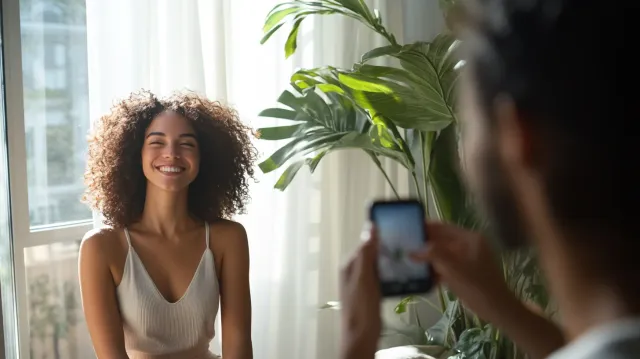
Large window light, indirect. A large window with diffused light — north-facing, or with sheer curtains, or in late-afternoon side light — is the closest free analogue to a studio softbox. Stand facing the window with the camera in front of you, the light landing on your face. Your shadow should fall behind you, not across your face. The light should be soft enough that you don't see hard-edged shadows under the nose.
Open shade outside. Find a spot where direct sun is blocked by a building or tree canopy, but the sky is still open and bright in front of you. The shaded area gives you soft, even light without the harsh shadows of direct midday sun. The classic location: the shaded side of a building on a bright day, with you facing the open sky. This is the workhorse setup for outdoor dating photos.
The light sources to avoid:
- Direct midday overhead sun. Hard shadows under the eyes, in the eye sockets, and under the nose. The "raccoon eye" effect that immediately reads as bad.
- Indoor overhead bulbs. Same problem indoors. The light comes from the ceiling and produces the same unflattering shadows.
- Backlight. Standing with a bright window or sky behind you, with the camera in front. The face loses detail and turns into a silhouette.
- Mixed light. Direct sun on half the face and shadow on the other half. Very hard to make work.
For interior shots, find the largest window in your space and shoot near it during the day. For exterior, find shade with bright open sky in front of you. The light alone is most of the photo.
Angle: Where to Put the Camera
The camera should be at eye level, with the lens roughly perpendicular to your face. That's the safe, flattering default for almost every face shape, and it's the angle that reads as "this person looks like a regular adult."
Two angles to avoid:
- Below eye level. Common with selfies held at the chest or below. Enlarges the chin, shows the underside of the nose, makes the face read as heavier and the eyes smaller. Universally unflattering for portraits.
- Significantly above eye level. Common with selfies held above the face. Shrinks the face, can read as childish or self-conscious, and at extreme angles distorts the forehead.
If you are shooting yourself with a phone, the answer is either (a) hand the phone to a friend who stands at the right height, or (b) use a tripod and a timer or remote. A selfie at arm's length will not produce a great dating profile photo at full eye-level perpendicular angle — the wide-angle phone lens at close range distorts facial proportions even when the height is right.
Lens and Distance
Phone cameras use a very wide lens (around 24mm equivalent on the front camera). At arm's length, that lens distorts faces — nose enlarged, ears pushed back, forehead elongated. The fix is distance. Step the camera back. A phone held by a friend from eight to ten feet away, framed for a head-and-shoulders shot, produces far less distortion than the same phone held at arm's length.
If you have access to a real camera with a portrait lens (50mm or 85mm equivalent), the geometry is already correct. Most of the "why do professional photos look so different" answer is just lens distance — pros use longer lenses at greater distance, which renders faces with the proportions a human eye sees.
For the longer breakdown of why phone-camera dating photos struggle, the diy headshots vs. professional post covers the side-by-side comparison.
Expression: The Real Smile Problem
The expression that wins as the lead photo on every dating app is a genuine, eye-reaching smile. The expression that loses is a forced grin or a stoic neutral stare.
The genuine-versus-forced distinction is real and visible. A real smile contracts the muscles around the eyes (the "Duchenne smile") and produces small lines and a slight squint. A forced smile pulls only the mouth — the eyes stay still. Viewers can see the difference at a glance, even if they can't articulate it.
The problem is that genuine smiles don't reliably happen on command. The fix is the same one professional photographers use: react to something. If you are shooting with a friend, have them tell a story, make a small joke, or ask you a question between shots. Look at the lens, break eye contact, look back, react. The frame that catches you in mid-reaction will be the best one of the session — and you'll often not realize it happened until you see the photos.
The single most common reason DIY dating photos underperform is forced expression. A real smile alone in front of a phone with a self-timer is very hard to produce. The reframe: take many more frames than you think you need, and accept that the keeper rate is low.
Wardrobe: Fit, Color, Variety
The wardrobe rules for dating photos are simple, and most lineups violate at least one.
Fit is the single biggest lever. A well-fitted t-shirt outperforms a poorly fitted designer piece. Anything visibly baggy or visibly tight reads worse than something that simply fits. If a piece doesn't fit, it doesn't matter how nice it is.
Solid muted colors photograph best. Navy, charcoal, deep green, burgundy, warm earth tones, dusty rose, muted teal. They render cleanly at the thumbnail sizes dating apps display. Pure white and pure black often blow out or crush to black in compressed images. Bright primaries can work but tend to dominate the frame.
Avoid loud patterns and large logos. At thumbnail size, busy patterns turn into noise and logos turn into billboards. A solid well-cut piece wins almost every time.
Vary the lineup. Don't wear the same outfit in five of six photos. One smart-casual look for the portrait, one fitted casual look for a relaxed frame, one activity-appropriate outfit for the action shot. The variety is what makes the lineup look like a life rather than a single afternoon.
The professional headshot wardrobe guide covers fit, fabric, and color in more depth, and most of it translates directly to dating-profile use.
Background: What Sits Behind You
The background's only job is to not compete with your face. The hierarchy of what works:
- Clean neutral wall. A simple painted interior wall in white, gray, or a muted color. Hard to beat for a clean lead portrait.
- Out-of-focus environment. A park, a street, a coffee shop window, with the background softened by depth-of-field. Gives a sense of place without distracting.
- Recognizable but uncluttered location. A specific spot — a city skyline, a lakeside, a forest trail — clearly readable but not busy.
What to avoid:
- Cluttered indoor backgrounds. Visible kitchen mess, an unmade bed, a cluttered desk. All read as low effort.
- The bathroom. Specifically. The bathroom mirror selfie is the single most over-represented frame on dating apps and the single least flattering.
- Anything with another person in it. Even a partial face or shoulder is loud, and a cropped-out ex is universally readable.
- Strong vertical or horizontal lines behind your head. A door frame or a horizon line slicing through your skull is distracting.
How Many Frames You Actually Need
The capture-to-keep ratio for portraits is much lower than people expect. A solid session aims for twenty to thirty good frames captured to produce six to ten keepers for the final lineup. The implication: take many more photos than you think you need. The keeper rate is low even with good setup and a real photographer, because the genuine-expression problem is statistical — most frames will catch you between expressions, mid-blink, or in a slightly off pose, and you only need the few that catch you well.
If you are shooting DIY with a friend, plan a session of at least thirty to fifty frames per "look" (per outfit and location combination). Sort ruthlessly afterward. The temptation to keep "good enough" frames produces lineups that have technical problems; sorting hard produces lineups that work.
The Lineup Mix
The six-slot lineup that works across every dating app, regardless of how the photos were captured:
- Strong front-facing portrait — your single best frame.
- Full-body shot — in fitted clothes, in a clean environment.
- Identifiable activity — something you can name and a viewer can ask about.
- Social context — with friends, clearly recognizable.
- Composed second portrait — different mood, slight smile or none.
- A wildcard — pet, place, project. A conversation hook.
The trap is to use six versions of slot one. Even if every frame is technically good, a lineup of six near-identical portraits underperforms because it gives a viewer nothing new to learn after photo two.
For app-specific lineup advice, the best Tinder profile photos and best Hinge profile photos guides cover the small differences in how the two platforms reward lineup variety.
When DIY Stops Being Enough
DIY dating photos work — to a point. With good window light, a friend behind the camera, fitted clothes, and patience, you can produce a serviceable lineup. Where DIY usually breaks down:
- The lead photo. This frame is the highest-stakes single image in your profile and the one that benefits most from professional lighting and direction.
- Expression on demand. A photographer who is reacting to you in real time produces more keeper frames per minute than any solo setup.
- Variety. Producing a full six-slot lineup with real variety in a single DIY session is hard. Most DIY lineups end up with three solid frames and three filler.
- Consistency. Mixed lineups — one strong professional portrait blended with casual phone shots — outperform either extreme alone. The professional anchor lifts the casual frames; the casual frames give the lineup a life.
A typical $395 dating-profile session at Photography Shark produces eight to ten usable frames — enough to fill the highest-stakes slots across Hinge, Tinder, and Bumble, with the casual phone shots filling out the supporting cast. The Boston dating profile photographer page covers what's included, and the dating profile photo session walkthrough walks through how the shoot itself runs.
Pre-Session or Pre-Shoot Checklist
Whether you're booking a session or shooting it yourself:
- Three outfits, all fitted, all solid colors, varied in formality.
- Haircut about a week out, not the day before.
- Sleep. Under-eye shadows are harder to fix than people think.
- Eye drops and lip balm in your bag.
- A short list of looks — smile, composed, outdoor context, an activity. A five-shot plan beats showing up with nothing in mind.
- A scout for light if shooting yourself — find your window, your shade, your background ahead of time.
- Plan for many more frames than you think you need. Volume produces the few great ones.
When DIY Becomes the Bottleneck
You can shoot a serviceable dating-profile lineup yourself with good window light, a friend behind the camera, and patience. What you can't easily produce solo are the three things this guide covers: lens distance (a professional uses 50–85mm at 8+ feet — phone selfies can't get there), expression on cue (real smiles need a reactive person on the other side of the camera), and the volume needed to get the few keeper frames. A professional session removes all three variables at once. Contact Photography Shark — Rockland MA studio, $395 base session, eight to ten frames typical, 3–5 day turnaround.
When you'd rather hire it out: Boston · Hanover · Marshfield · Weymouth · South Shore
Free download: the free Dating Profile Photo Guide — prep, wardrobe, posing and the six-photo lineup in one PDF.
Related reading: Bumble photo lineup guide · Best Tinder profile photos · Best Hinge profile photos · Dating profile photos for men · The importance of a perfect dating profile photo
Frequently Asked Questions
How do you take good dating profile pictures yourself?
Shoot in soft window light or open shade, never direct midday sun. Use a real camera or hand a phone to a friend — never a selfie. Get the camera at eye level, not below or above. Wear clothes that fit, in solid muted colors. Smile at something genuinely amusing rather than performing a smile for the camera. Take many more frames than you think you need — the keeper rate is low even with a good setup, so volume is what produces the few great images.
What is the best lighting for dating profile photos?
Soft, diffused, slightly frontal light. The two reliable free sources are large windows (north-facing or with sheer curtains) and open shade outside on a bright day. Avoid direct overhead sun, which throws hard shadows under the eyes and nose, and avoid indoor overhead bulbs for the same reason. The camera should be facing the same direction as the light, not opposite it — backlit photos lose detail on the face.
What camera angle is best for dating profile photos?
Eye level. The lens should be at the same height as your eyes, with the camera roughly perpendicular to your face. Shooting from below enlarges the chin and shows the underside of the nose; shooting from above shrinks the face and looks dismissive. Eye-level is the most flattering default for nearly every face shape and the angle that reads as "this person looks like a regular adult."
How many dating profile photos do you need?
Plan to capture twenty to thirty good frames in a session and select the strongest six. Hinge, Tinder, and Bumble all support six photo slots and lineups perform best when all six are used with real variety. The capture-to-keep ratio is much lower than people expect — a session producing twenty solid options gives you the headroom to pick the right mix, not just the available frames.
Are professional dating photos worth it?
For active daters, almost always. A professional session removes the technical and structural problems that DIY photos quietly carry — lens distortion, bad light, forced expression, missing variety — and produces eight to ten frames good enough to anchor a full lineup across every app. The same images keep working for twelve to eighteen months, which makes the per-month cost lower than nearly any subscription a dater is already paying.
What clothing colors photograph best for dating photos?
Solid muted colors — navy, charcoal, deep green, burgundy, warm earth tones, dusty rose, muted teal. They render cleanly at the thumbnail sizes dating apps display and don't compete with the face for attention. Pure white and pure black often blow out or sink into shadow in compressed app images, and loud patterns or large logos pull attention away from the face. Fit matters more than fabric — well-fitted basics outperform poorly fitted premium pieces.
How do you smile naturally in dating profile photos?
React to something real rather than perform an expression. Have the person behind the camera tell a story, ask a question, or make a small joke between shots. Look at the lens between attempts rather than staring at it, and break eye contact briefly before each new frame. Forced smiles tighten the eyes; the eye-engaged smile that reads as warmth on dating apps usually only happens in response to something, not on command.
Related Posts
You Might Also Like
About the Author
Chris McCarthy
Chris McCarthy has run Photography Shark Studios in Rockland, MA for over 10 years and 500+ sessions, with executive headshot work for Rockland Trust, Clean Harbors, M&T Bank, and McCarthy Planning; founder portraits for AI startups including Lowtouch.ai; product photography for South Shore brands like Lauren's Swim; and headshots across South Shore legal, medical, financial, and academic practices. Every session is personally shot and edited by Chris on Sony mirrorless and Godox strobe systems — no assistants, no outsourcing, no batch retouching. Galleries deliver in 3–5 business days. About photographer Chris McCarthy →
Photography Shark · Boston & South Shore MA
Ready to Book a Session?
Professional headshots, senior portraits, boudoir, and model portfolios. Studio in Rockland, MA — 25 miles south of Boston. Sessions from $395.