Photography Tips
Rembrandt Lighting: A Guide for Portraits
How Rembrandt lighting works in portraits — the triangle, the geometry, and when Chris McCarthy applies it at Photography Shark's Rockland studio.
Chris McCarthy
Professional Photographer, Photography Shark · December 30, 2024 · Updated May 24, 2026
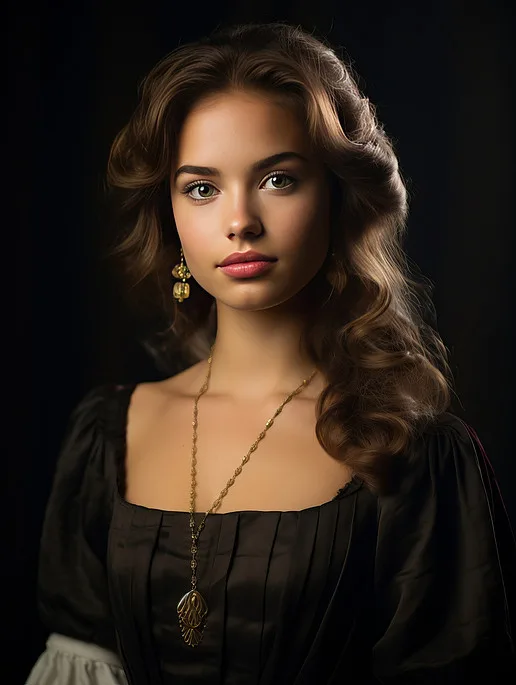
Rembrandt lighting is named for the 17th-century Dutch painter who used it consistently in his portraits. The defining characteristic is a small triangle of light on the shadow side of the face, formed where the light from the key source wraps around the nose and meets the shadow cast by the brow. This triangle is the visual signature — it tells you the lighting pattern was deliberate and controlled rather than accidental. In modern portrait photography, Rembrandt lighting communicates authority, dimension, and visual sophistication in a way that flatter lighting patterns cannot.
I have worked through this question with clients at my Rockland studio more times than I can count, and the answer is more straightforward than most people expect.
At the Photography Shark studio in Rockland, Chris McCarthy uses Rembrandt lighting selectively — primarily for executive portraits, actor headshots, and character-driven personal work. It is not the default for every session because its dramatic shadow structure does not suit every purpose, but when the goal is depth and presence, it is the most powerful single-light setup available.
The geometry of Rembrandt lighting
The setup is deceptively simple. One key light is positioned approximately 45 degrees to the side of the subject and angled downward at 30–45 degrees. The downward angle is critical: it creates the brow shadow that forms the upper boundary of the triangle on the shadow side. The lateral position creates the nose shadow that forms the inner boundary. Where those two shadows intersect and leave a small gap — typically just large enough to contain the subject's eye on the shadow side — the triangle appears.
The triangle should be roughly the width and height of the subject's eye. Smaller than that and it reads as accidental shadow rather than deliberate lighting. Larger and the pattern transitions into a loop or flat lighting setup. The precision of the triangle tells a trained viewer that the photographer placed the light with intention.
Key light modifiers and their effect
The character of the Rembrandt triangle — whether it has sharp edges or soft gradients — depends on the modifier used on the key light.
Bare reflector or small dish. Produces the hardest, most defined triangle with crisp shadow edges. This is the most dramatic version and the closest to the actual Rembrandt painting aesthetic. It suits character portraits, editorial work, and any context where intensity is the goal. The downside is that hard light is unforgiving of skin texture and requires confident retouching.
Medium softbox (24"–36"). The standard studio choice. The triangle remains defined but the transition between light and shadow is gradual rather than sharp. This is the most versatile Rembrandt setup — dramatic enough to read as intentional, soft enough to flatter most skin types. Photography Shark's default Rembrandt setup uses a 36" softbox with an inner diffusion panel.
Large softbox or octa (48"+). The triangle becomes very soft, almost blending into the general fill. The Rembrandt pattern is still technically present but the drama is muted. This version works when the client wants the dimensional quality of Rembrandt without the high-contrast look — common in corporate executive portraits where the image needs to be authoritative but not theatrical.
Fill light decisions
The shadow side of a Rembrandt portrait can be handled three ways, and each produces a materially different image:
No fill (high ratio). The shadow side goes very dark — possibly to complete black. This produces the most dramatic, editorial result. It works for actor headshots, character portraits, and any context where the image is meant to be striking rather than accessible. The lighting ratio is approximately 8:1 or higher.
Reflector fill (medium ratio). A white or silver reflector positioned opposite the key bounces ambient and key light back into the shadow side. The triangle remains visible but the shadow areas retain detail. This is the most common production choice — it preserves the Rembrandt character while keeping the image readable and printable. The ratio is approximately 3:1 to 4:1.
Active fill (low ratio). A second light source at low power fills the shadow side. The Rembrandt triangle is barely visible, and the overall effect is more dimensional than flat lighting but less dramatic than true Rembrandt. This is a compromise position that some corporate clients prefer — they want the authority of directional lighting without the theatrical intensity.
When Rembrandt lighting is the right choice
Rembrandt lighting works best when the narrative of the portrait is about substance, depth, or authority. It is the natural choice for:
- Executive headshots where the subject holds a position of authority and the image will appear in institutional contexts (annual reports, press pages, board decks). The shadow structure communicates weight and seriousness. See executive headshots Boston for how this fits into the broader executive session.
- Actor headshots where the goal is dramatic or character-driven casting. Rembrandt lighting reads as "serious actor" in a way that flat commercial lighting does not.
- Author and speaker portraits where the subject needs to project intellectual authority.
- Personal branding for coaches, consultants, and founders who want to project depth rather than approachability.
It is less suited to:
- LinkedIn headshots where warmth and approachability are the priority. Clamshell lighting or butterfly lighting is more appropriate.
- Commercial headshots for client-facing roles (sales, HR, customer service) where the image needs to read as friendly and open.
- Younger subjects (seniors, new graduates) where the dramatic shadow structure can feel incongruent with the subject's age and context.
Setting it up at home versus in a studio
Rembrandt lighting can technically be produced with a single window and no equipment — place the subject at a 45-degree angle to the window with the window above eye level, and the geometry is close. The result will not match a studio setup because window light changes with the time of day, the weather, and the window's orientation, but the basic pattern is achievable.
The studio advantage is repeatability. At Photography Shark, the Rembrandt setup is a stored configuration — the light position, the modifier, the power setting, and the subject distance are calibrated and documented. This means the same look can be reproduced across sessions weeks or months apart, which matters for teams, board members, and professionals who need their headshot to match colleagues who were photographed on different dates.
Booking a Rembrandt-lit session
If you want the Rembrandt look for your headshot or portrait, mention it when you book. Chris discusses lighting direction during the pre-session consultation and will confirm whether Rembrandt is the right fit for your intended use. Studio headshot sessions start at $395 at 83 E Water Street, Rockland MA — call (781) 312-8824.
Practising Rembrandt Lighting
This is a pattern you learn by moving one light and watching the triangle appear and vanish. If you do not have the space at home, the Rockland studio is available to rent by the hour at $55 — strobes, modifiers and backdrops included, two-hour minimum, free parking.
Frequently Asked Questions
Does Photography Shark offer Rembrandt lighting for headshots?
Chris McCarthy applies Rembrandt lighting selectively at the Rockland studio. It's a strong choice for character-driven portraits but not the default for clean commercial headshots, which use softer, more even lighting patterns.
What headshot packages does Photography Shark offer?
Packages start at $395 for a 30-minute session with 10 edited images, Studio headshot sessions are $395 for 30 minutes with 10 fully retouched images. On-location sessions are $495. Add-ons: additional session time $100 (extra 30 min), outfit change $100, additional person $200, group shot $100. Turnaround is 3-5 business days.. All sessions are at the studio at 83 E Water Street, Rockland MA.
How do I request a specific lighting style for my session?
Mention your preferred style when you book. Chris discusses lighting direction during the pre-session consultation so the setup matches your goals — whether that's Rembrandt, loop, butterfly, or flat commercial lighting.
Can Rembrandt lighting work for women's portraits, or is it mainly for men?
Rembrandt lighting works for any subject when the goal is expressive, dimensional portraiture. It is less ideal for beauty-driven commercial headshots regardless of gender, where flatter, more even light is standard.
How far in advance should I book a portrait session in Rockland?
Booking one to two weeks ahead is typical. Weekend slots and peak seasons like spring and fall for senior portraits fill faster. Contact Photography Shark directly at photographyshark.com to check availability.
Related Posts
You Might Also Like
About the Author
Chris McCarthy
Chris McCarthy has run Photography Shark Studios in Rockland, MA for over 10 years and 500+ sessions, with executive headshot work for Rockland Trust, Clean Harbors, M&T Bank, and McCarthy Planning; founder portraits for AI startups including Lowtouch.ai; product photography for South Shore brands like Lauren's Swim; and headshots across South Shore legal, medical, financial, and academic practices. Every session is personally shot and edited by Chris on Sony mirrorless and Godox strobe systems — no assistants, no outsourcing, no batch retouching. Galleries deliver in 3–5 business days. About the photographer →
Photography Shark · Boston & South Shore MA
Ready to Book a Session?
Professional headshots, senior portraits, boudoir, and model portfolios. Studio in Rockland, MA — 25 miles south of Boston. Sessions from $395.